Sunday, January 30, 2011

Saltine Cracker Toffee


Almost ten years ago, my husband and I moved into our house. Our court was built amongst older homes, since it was one of the few empty lots left in the city. With that, all of the neighbors were new and we quickly moved in one by one. With any new development, the first year is spent getting to know one another socially.


One of my neighbors moved here from Atlanta and quickly we realized that we both shared a passion for cooking and entertaining. With her southern roots now planted in the Bay Area, she had great recipes to share. One such recipe was this Saltine Cracker Toffee. I was amazed how easy yet incredibly delicious and simple it was. I had altered the original recipe to decrease the butter which cut out “some” calories along with making the whisking process a bit easier.


This has been a favorite for a number of years among family, friends and co-workers. Speaking of co-workers, there seems to be an affinity for cooking and baking. One day, Denise and I were talking about candy making and she shared her experience with making toffee. I have yet to make it the traditional way. I then shared my quick and easy way with saltines. We decided to have a “toffee-off” at the office. No contest or prizes were part of this toffee off – just the satisfaction of tasting great toffee done two ways.


I must say, every person enjoyed both toffees and appreciated the uniqueness of both. It was a great way to add some fun to the office and get a bit of sugar high throughout the day.

Saltine Cracker Toffee

1 ½ c. butter
1 c. brown sugar
35 saltine crackers
12 oz. Dark chocolate chips
1/2 c. Chopped and toasted pecans

Spray a large cookie sheet with your favorite non-stick spray. Place crackers in a 5 by 7 row close together to form bottom layer. In a 4 quarter Pyrex measuring cup, place butter and brown sugar, heat on high in the microwave for 5 minutes. Remove from microwave and whisk with a whisk for 2 to 3 minutes until light, creamy and well combined.

Spread evenly over crackers with a knife. Bake at 350 degrees for 13 minutes. Remove and push together the cracker together before sprinkling with chocolate chips evenly over top. Wait a few minutes, and then spread with spatula. Sprinkle with nuts. Cool in refrigerator. Break into pieces. Keep in an airtight container in the refrigerator for best results.


Thursday, January 27, 2011

Coffee Chili


Do you ever watch those cooking competition shows? Especially the ones where the contestants say they have a secret ingredient or family recipe, and of course you are dying to know what the secret is. Sometimes they share and other times, it is truly kept as a secret. It is fascinating that these secret ingredients are truly the distinguishing factor which brings the dish from good to great.


Monday, January 24, 2011

Russian Tea


Memories are something that is uniquely special to each person. They are like a mini movie that plays in your mind whenever you want to hit the play button. Sometimes memories come to the surface from seeing a photograph, smelling a scent or hearing a song. It is amazing how these can catapult you right to that moment in time and experience a memory.


One such lovely memory from childhood is enjoying a piping hot cup of Russian Tea. My Mom would create this beautiful concoction of tea, tang and spices. Yes – I said Tang. It is the secret ingredient to this sweet and spicy delight. Where the name "Russian Team" came from, I do not know. I must admit as a kid, Tang was quite popular and my Mom would buy it for us. To this day, I sometimes crave a tall, icy glass of Tang – although the sugar count is out of this world, so I must resist.


For the holidays this year, I decided to give and share my canning projects that I had been creating for close to seven months with my friends and family. For my family, I chose a theme straight out of London by using what they call hampers. Fortnum & Mason is known world wide for selling outstanding luxury food hampers. Each time I have been to Fortnum & Mason, we carefully select unique chutneys and jams to ship home. Quite frankly, we probably spend more in shipping than the actual items.


I found “hamper like” baskets from Pier One which was just about what I envisioned. After adding cushioning on the bottom of each hamper with crumpled newspaper, I packed each hamper with about fourteen various items from my canning adventures and tied it up with beautiful ribbon. As each year passes, purchasing gifts seems to be more challenging. This year I wanted to personalize and give gifts of love – thus the hamper idea was born. Our family has an affinity with London and appreciates gifts from the heart, so it was a perfect idea.


I wanted to add a bit of nostalgia to the hamper, so I added the Russian Tea. My Mom, sister and brother all instantly knew what it was and there was a smile from ear to ear on their faces. I hope that my sister and brother will share with their children and the tradition will continue. Thank you Mom for creating such wonderful memories – I love you!

Russian Tea

2 C. Tang
1 C. Instant Tea
1 Pkg. Lemonade Mix
½ C. Sugar
1 t. Ground cloves
1 t. Cinnamon

Mix all together and keep in an airtight container. Use approximately two heaping teaspoons for one cup of tea.


Saturday, January 22, 2011

Gorgonzola and Cherry Pastry Puffs


I have long had a love affair with appetizers. Each small bite can be filled with simple or complex flavors .A couple years ago on a Saturday, I hosted a “cooking class” at my house for a half a dozen co-workers. The theme was “All Appetizers”. I put together a packet of the recipes and purchased all of the ingredients. Everyone just simply showed up and contributed money towards the ingredients.


For this particular cooking class, I set aside about 7 to 8 different recipes ranging from Thai Spring Rolls with Peanut Sauce to simple Brie and Chutney Cups. I served sparkling wine for everyone and we ate each appetizer along the way. By the end of the three hour time period, each person was quite satisfied.


Christine, who has worked for me for the past six years, was probably the most excited about the class. She took copious notes. Literally right after the class she drove to Trader Joe’s and purchased quite a few items to make the recipes for her family that night. To this day, she still makes a lot of the recipes from the class and has passed them along to her friends and family.


Last week, I had my annual team appreciation lunch. The Gorgonzola and Cherry Pastry Puffs were a complete hit with the entire team. It was such a simple appetizer that will impress any guest. Christine stayed after the lunch to help me clean up, which was a complete help. Before she headed out, she wrote down the recipe for the cherry puffs and made it that night for her family. It makes me smile from ear to ear to know that she loves my appetizer recipes so much.


Gorgonzola and Cherry Pastry Puffs

1 sheet frozen puff pastry, thawed
¼ C. Dried cherries, finely chopped
3 T. Cherry preserves
½ C. Crumbled gorgonzola
2 T. Pecans finely chopped and lightly toasted or dry roasted

Heat oven to 400 degrees. Spray 36 mini muffin cups with cooking spray.

On a lightly floured surface, unfold the pastry sheet. Cut the sheet into 6 rows by 6 rows to yield 36 1 ½ inch squares. Lightly press 1 square into each muffin cup, pressing the center to the bottom of the cup with your finger. Bake 10 minutes.

Meanwhile, in a small bowl, mix dried cherries and preserves until well blended, set aside.

Remove the pastry cups from the oven and with the handle of a wooden spoon, press the centers. Add a teaspoon of the gorgonzola cheese to each one, and then top with a ½ teaspoon or so of the cherry mixture. Sprinkle a few pecan pieces on each one.

Bake for 2 to 4 minutes or just until the cheese is melted. Carefully remove each one with a sharp knife and serve.

Tuesday, January 18, 2011

Cheddar-Dill Scones


One of my cooking idols is Ina Garten of Barefoot Contessa. Her style and approach to cooking is completely simple yet everything she makes abounds with flavor. If you were to ask me of all the famous cooking personalities I would like to meet and cook with, it would have to be Ina.

Several years ago, along with our really good friends, Mark and Dean, we started a gourmet club. One of our first menus was inspired by Ina’s 4th cookbook – Barefoot in Paris. We aptly titled the menu – “An Evening in Paris with Ina”. It was our homage to this iconic cookbook author, entertaining mentor and overall fantastic cook. A toast was done in her honor. The evening was so much fun and a complete success.


Several years ago, I was introduced to Ina’s cookbooks by my former neighbor and instantly fell in love with her style of cooking and entertaining. I soon purchased Ina’s first book and subsequently added to the collection each time a new one was available. Ina’s books have a special place in my cookbook bookcase. If I am looking for a proven recipe that is a winner each time, there is no question that I am heading for a Barefoot Contessa book.


I have found that with her catering background, the recipes are written to feed an army. Not literally, but typically I will cut them in half and it is perfect for my needs. Last weekend, while browsing between Food Network and The Cooking Channel, I caught Ina making her Cheddar-Dill Scones. My mouth began to water and knew that these needed to be made soon.


On Sunday, it was extremely foggy in parts of the Bay Area. Particularly where we live, it was like “pea soup” as they say. The fog set the tone for the Sunday morning breakfast. One of my husband’s favorite breakfast foods is corn beef and hash. Believe it or not, he loves the one from the can. Yes, I said it – the can. This weekend, I made him happy by serving the canned version with a fried egg on top. However, I needed to add the gourmet touch to the meal and that is where Ina’s Cheddar-Dill Scones came into the picture.


These scones are light, savory and crispy on the bottom. Can’t hurt that there is a “ton” of butter in these and add to the deliciousness. I took the recipe and made a half batch, which yielded about 16 scones. The recipe below reflects the half version. They were absolutely perfect with the corn beef hash. In fact we enjoyed them with chili for dinner that night.

Ina, you are simply the best!


Cheddar-Dill Scones

2 cups all-purpose flour, divided
1 tablespoons baking powder
1 teaspoons salt
1 ½ cubes butter, diced
2 large eggs, beaten lightly
½ cup cold heavy cream
¼ pound extra-sharp yellow Cheddar, small-diced
½ cup minced fresh dill
1 egg beaten with 1 tablespoon water or milk, for egg wash

Preheat the oven to 400 degrees.

Combine 2 cups of flour, the baking powder, and salt in the bowl of an electric mixer fitted with a paddle attachment. Add the butter and mix on low speed until the butter is in pea-sized pieces. Mix the eggs and heavy cream and quickly add them to the flour-and-butter mixture. Combine until just blended. Toss together the Cheddar, dill, and 1 tablespoon of flour and add them to the dough. Mix until they are almost incorporated.

Dump the dough onto a well-floured surface and knead it for 1 minute, until the Cheddar and dill are well distributed. Roll the dough 3/4-inch thick. Using a round cookie cutter about 2 inches wide, cut the scone. Brush the tops with egg wash. Bake on a baking sheet lined with parchment paper for 15 minutes, until the outside is crusty and the inside is fully baked.


Sunday, January 16, 2011

Sticky Toffee Pudding + Team Appreciation Lunch


I love traditions. For the last eight years I have hosted an annual appreciation lunch for my direct reports to thank them for all of their hard work during the year. This year was no exception. With the challenging economy the last couple years, we have celebrated small wins. In 2010, our company had a banner year. I am in an industry that is an economic leading indicator and quite thankful for having such success in 2010.


{Lisa, me, Debby, Patti, Stefanie, Christine and Amy }

Success is gained by having a team of talented individuals who understand the goals to be achieved and are driven to work hard. With the economy slowly beginning to improve, there is a much more positive feeling at our company. Since the holidays are filled with taking our clients out to lunch to thank them for their business, December is challenging to get the team together during business hours. Thus I typically plan the appreciation lunch for the beginning of January.


During the holidays, I began to contemplate the menu. I typically do not like to repeat any dishes and make a fresh menu each year. Since it is lunch time, I want to make it light but usually I add in a dish or two that is a tad heavier. Oh heck, it is a celebration, so let’s swing out and eat. Nine times out of ten, I don’t need dinner that night, since I am still satisfied from lunch.

The menu this year consisted of some favorites I have made and posted on the blog. Thought I would share the menu with each of you:

Appetizers
Gorgonzola and Cherry Pastry Puffs
Shaved Brussels Sprouts with Parmesan and Truffle Oil Crostini
Caprese Bites


Starter
Pear, Gorgonzola and Pecan Salad with Pomegranate Vinaigrette


Main
Hoisin and Orange Braised Short Ribs
Sour Cream Mashed Potatoes

Dessert
Sticky Toffee Pudding with Handmade Caramel Sauce

Each person arrived separately. With having a shoe free house, the guest slippers were at the front door. My boss Tony arrived with his own personal slippers, since he knew the drill. The appetizers were laid out on the kitchen island along with a bucket full of assorted non-alcoholic beverages. We soon moved to the family room to enjoy the appetizers and each others company.


{Lisa, Amy, Patti and Tony (my boss) }

I created personalized menus for each person and did double duty by having a place card all in one. Each person could also take their menu home to enjoy. We sat down for the salad course and the conversation was moving along nicely. Christine was my helper this year, which makes the serving and clean up a breeze. Throughout the afternoon, I had several helpers and it was so appreciated.

We now went onto the main course of Hoisin and Orange Braised Short Ribs. This is hands down my signature dish and super simple to make. Just a quick tip – try braised dishes when entertaining for a group of 6 to 10 people. It can be made ahead of time, cooks ahead and during the dinner until you are ready to serve. How simple is that?


{Debby, Stefanie and Christine }

The dishes were cleared and now it was time for dessert. During the holidays, while watching Martha Stewart, she had Jane Homby as a guest on her show. Her book is titled - "What to cook & how to cook it". Jane demonstrated how to make her version the traditional British holiday dessert of Sticky Toffee Pudding. I decided to adapt her version slightly and make it for the appreciation lunch.


We also do a small gift exchange as part of the celebration and fun. I think each person walked away with a gift they will enjoy. Since I had done so much canning this year, I gave each person a small bag with a jam, chutney or jelly in it.

I look forward to another amazing year in 2011~

Sticky Toffee Pudding

Cake

5 ounces pitted dates (Madjool dates work great)
1/2 cup plus 6 tablespoons (1 ¾ sticks) butter
1 Cup packed dark-brown sugar
4 large eggs
1 t. Vanilla extract
½ t. ground cinnamon
Pinch of ground clove
Pinch of freshly grated nutmeg
1 t. baking powder
1 ¼ C. flour
¼ t. salt

Place dates in a small bowl and cover with boiling water. Let the dates sit for 5 minutes. Drain the dates and discard cooking liquid. Transfer to the bowl of a food processor; process until smooth. Let cool slightly. Meanwhile, preheat oven to 350 degrees. I used a mini bundt pan that made six small cakes and sprayed with cooking spray that had flour added.

Add butter and brown sugar to bowl of food processor with dates; process until smooth.

Add eggs, vanilla, cinnamon, clove, nutmeg, flour, baking powder and salt; process until smooth. Spoon batter into prepared pan; transfer to oven and bake until a cake tester inserted into cake comes out dry, 20 to 25 minutes. Spoon sauce over cake and serve with cream or ice cream, if desired.

Caramel Sauce

1 ½ C. sugar
¼ C. water
½ t. lemon juice
1 C. heavy cream

Stir sugar, water and lemon juice in a large saucepan over medium heat until the sugar dissolves. Increase the heat; boil without stirring until the mixture turns deep amber brown. This should take about 9 minutes. Take off the stove and hold over the sink before pouring the cream mixture into the sugar mixture. It will boil and bubble. Once calmed down, add to back to the burner and reduce slightly over medium low heat for about 8 minutes. Chill until thickened. Put into another container and slightly heat when ready to use.


Thursday, January 13, 2011

Cranberry Streusel Cake


There is something about Sunday mornings. If I were to put my finger on what it is, I would have to say there is a grand feeling of relaxation. Typically most Sundays start off slow at our house. My husband is up earlier than myself and faithfully watches the weekend edition of Good Morning America. He has a cup of coffee in hand while browsing the internet on his ipad.


Last Sunday, I had the urge to make a coffee cake that I saw on the blog, Sweet Paul. The photography just captured my breath and it was a must make. I realized that I did not have any sour cream in the house and was not going to jump in the car to go to Safeway, so the search began for a substitution. Once the refrigerator door was open, I found honey flavored Greek yogurt and crème Fraiche. I simply substituted the sour cream for these two ingredients with ¾ cup of each. It probably made the coffee cake a bit denser but none the less, it was delicious. I did need to cook for about 20 more minutes.


For the last couple years, I have purchased a half a dozen bags of cranberries at the end of the season to toss in the freezer, so I can create cranberry recipes year round. I just adore these tart little gems in anything from chutneys to muffins.


On the way to work today, my neighbors pulled along side me while we were waiting for the light to change. We rolled down the windows and they let me know how much they enjoyed the coffee cake that I brought over Sunday afternoon. As the light turned green, I did not have much time to chat, but gave a thumbs up and off to work I went. If you are feeling like having a special Sunday treat, give this a try.


Cranberry Streusel Cake

2 ½ C. Flour
2 t. baking powder
1 stick salted butter, softened
1 C. sugar
3 large eggs
½ t. Vanilla extract
¼ t. almond extract
1 ½ cups sour cream
2 cups fresh cranberries
3 T. sugar

Topping

½ C. Brown sugar
1 ½ Flour
1 1/2 stick salted butter, softened

Preheat oven to 350.

In a medium bowl mix together flour and baking powder. Butter a 9 inch spring form pan. Cream butter and sugar until light. Add the eggs, one at a time, stir well. Add vanilla, almond extract, sour cream and the flour mixture. Beat until combined.

Fold the cranberries into the batter and spoon the batter into the spring form pan. For the topping, in a small bowl work together sugar, flour and butter until crumbly.

Sprinkle crumbles on top of cake. Bake until golden brown, about 50 to 60 minutes. Test with a knife to ensure it is cooked thoroughly. Dust with confectioner's sugar before serving.


Saturday, January 8, 2011

Pomegranate Jelly


There is a distinct attraction to pomegranates. Not quite sure I can put my finger on it. Is it the little scarlet red jewel seeds inside? Is it the unique flavor of the juice? Or is it the wonderful health benefits of the antioxidants? Actually, I believe it is all three plus a whole lot more. The pomegranate is native from Iran to the Himalayas in northern India and was cultivated and naturalized over the whole Mediterranean region since ancient times. The pomegranate tree was introduced into California by Spanish settlers in 1769.


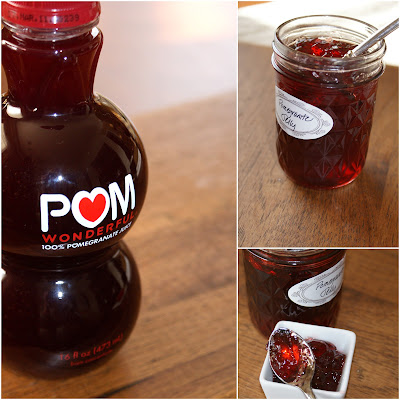
As a kid, I enjoyed pomegranates and would slowly pick the seeds out of the beautiful round fruit and eat them one by one. Once you bit down, a burst of sweet juice would awaken your mouth and left you wanting more. Today, I am fortunate that there is a company called POM Wonderful located in Southern California who produces a variety of pomegranate products. The actual fruit is being grown in the sunny region of central California. Imagine, an entire company dedicated to just one fruit – that is what makes them masters in their field.


Over the holidays, I was quite obsessed with canning. My mission was to create a wide variety of canned goodies to give to family and friends. While browsing through Jellies, Jams & Chutneys by Thane Prince, I came across page 171 which was a recipe for pomegranate jelly. Perfect - I thought to myself. I would run down to Safeway and pick up multiple bottles of POM Wonderful and begin my jelly making process.


The recipe was simple and I knew that the flavors of the pomegranate would be just perfect on a piece of toast or warm freshly baked scone. I decided to double the recipe to yield a large enough batch for my entire gift giving requirements. The beauty of this recipe is that you can make it year round since POM Wonderful is available all of the time.


Pomegranate Jelly

4 C. POM Wonderful Juice
5 Cups Granulated sugar
1 package powdered pectin (1.75 oz)
2 Lemons, freshly squeezed

Put all of the ingredients in a non-reactive pot, and bring mixture slowly to a boil.
When the sugar has completely dissolved, cook the mixture at a full rolling boil for 2 minutes, then test for a set. Once the setting point has been reached, ladle the jelly into hot sterilized jars, seal, process and label.

Tuesday, January 4, 2011

Bacon-Filled Medjool Dates


Lottery fever is running rampant across the United States as the Mega Millions winning jackpot is over three hundred million. The big question is: What would you do if you won? Personally I would be in a state of shock. Half of the fun is imagining how you spend the money and dreaming. Not to say that winning would be half bad. Unfortunately the odds stretch the realm of reality almost, but one or two lucky folks could walk away and have their lives changed forever.

Having great friends, whether they are long term or new friends is like winning your own personal lottery. "Friends are the most important ingredient in this recipe of life" is a quote I found and it struck a chord with me. Friends are an important part of my life and I cherish each of them dearly. Everyday life takes over and we get busy with work, activities, daily demands and all of the other items. I have found that scheduling time with friends is the best way to ensure we make the time to get together.


One of my long time friends Denise lives in San Diego and unfortunately we do not see each other often enough with our busy schedules. We did connect early in December and she mentioned she would be here for the holidays. Typically we get the girls together and dine at a restaurant and exchange small gifts each year. It is so much fun just to dine, gab and spend an evening together catching up. This year I thought it would be fun to throw a cocktail party at my house and invite everyone over. Even the husbands were able to join us this year!

I made a large spread of appetizers and everyone brought a favorite bottle of wine. Making appetizers is my favorite way to eat and entertain. All of those small bites of flavors and the variety make entertaining fun along with being easy. Thought I would share the menu with all of you.


The girls enjoyed our annual gift exchange and the stealing of gifts got a bit fierce. All in all, I do think everyone was quite pleased with what gift they ended with. The evening was a smashing success and I believe everyone had a terrific time. It is such a special treat to entertain at home with great friends, especially during the holidays.


{ Betsy, Denise, Jackie, Anna, Helen and Me }

Bacon-Filled Medjool Dates

6 Slices of bacon
½ C. Pecans, chopped and lightly toasted
½ C. Manchego cheese shredded, (2 ounces)
24 whole madjool dates, pits removed
3 T. Honey
1 t. Fresh thyme

Preheat oven to 375 degrees. In a large skillet cook the bacon until crispy. Remove bacon and drain on a paper towel. Crumble bacon. In a small bowl combine the crumbled bacon, manchego cheese and pecans. Mix well together until the cheese combines a bit.

Make a slit down the center of the date, remove the pit and place a tablespoon of the mixture into each date. Press the date to shape around the mixture and the filling will be exposed. Arrange dates on an ungreased baking sheet.

Bake for 8 to 10 minutes or until heated through. Arrange on a platter and drizzle with honey and place a thyme leave on top of each date. Serve immediately.

(Recipe from Better Homes and Garden)