Friday, August 31, 2012

Red Velvet Cake Balls + Cookbook Giveaway


Who doesn’t love a sweet treat? I honestly do not know a lot of folks who simply don’t adore a sweet bite or two. Perhaps it might be frequent or infrequent, but there is no denying a well executed dessert is purely decadent. Several weeks ago I was contacted by Meghan from The Harvard Common Press. I was extremely flattered when she asked me if I wanted to be part of the blog tour to promote Dede Wilson's two new cookbook releases: Cake Balls and A Bakers Field Guide to Doughnuts.


Okay, maybe I might be the last person on earth who had never made a cake ball. Not sure why I had never gotten around to experimenting with this tiny bite sized ball of delightfulness. The good news is that Mehgan was kind enough to send me a copy of each book prior to the official release in September. I toyed with testing out a doughnut recipe, but I think I will save that for later. I was simply intrigued to test my hand at making my very first cake ball.
.

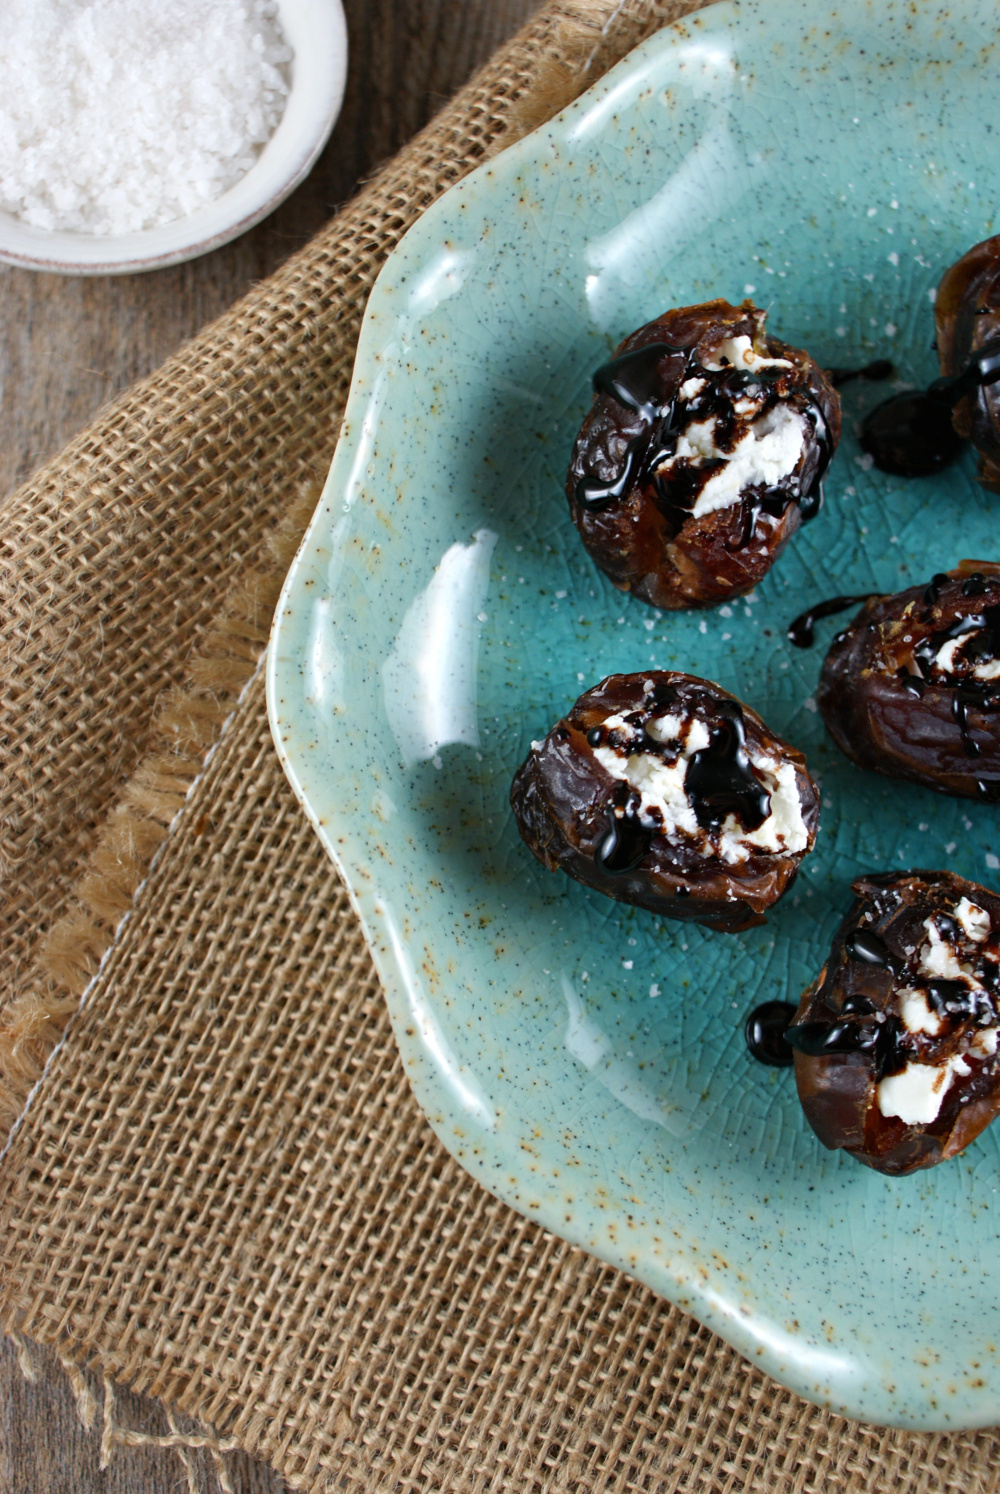
After perusing numerous times through Dede’s fun filled and whimsical cake balls, I narrowed it down to the Red Velvet Cake Balls. Trust me between the Chocolate Chip Cookie Dough Cake Balls, Confetti Cake Balls, Espresso Brownie Cake Balls and the Midsilde Cake Balls, it was a tough decision. Dede features over 60 wonderful and easy cake ball recipes in her book. She defines them as “delectable & whimsical sweet spheres of goodness”. I could not agree more.
.

I was fortunate enough to have an interview with Dede to gain her perspective on desserts, writing cookbooks along with some personal insights. Dede is a contributing editor to Bon Appetit magazine and the author of thirteen books featuring sweets, desserts and baking. Please enjoy getting to know Dede Wilson:
.

When did your love for cooking begin and who was your inspiration?
Both of my parents were amazing home cooks. My dad was traveling all
over the world for business and would bring home spices, condiments
and recipes. In the 60's and 70's I was eating authentic Chinese,
Indonesian and Italian. Little did I know that my palate was being
educated!

How do you come up with the ideas for your cookbooks?
Sometimes it is a flavor that inspires, like chocolate for my book
Truffles. Other times it is a trend, like my newest Cake Ball book and
doughnut book. The sweet treats themselves were inspirational.
.
What is your all time favorite dessert, and why?
I refuse to pick a favorite child! But I have a soft spot for dark
chocolate and I also have an emotional connection to a classic
two-crusted blueberry pie, which is what my Nana always made for me.
She used 100% Crisco in her crust and orange juice for the liquid.
Brilliant.
.

Where does your knowledge about baking come from? Are you
professionally trained, or is it trial and error?

I am self-taught. If I can do it, you can do it! I have always just
had an insatiable curiosity about food and read endlessly - and then
head to the kitchen to practice and play. Recently a friend was
telling me excitedly about reading 50 Shades of Gray. She asked me if
I had read it. I said, Um, I'm reading the cookbook Sugar Baby by
Gesine Bullock-Prado. She stared at me blankly LOL. That's what was on
my nightstand. I devour food information.
.
What inspired you to write your latest releases - Cake Balls
and A Baker’s Field Guide to Doughnuts?

Doughnuts are hot right now and we knew they would fit perfectly into
the Field Guide format, so that was a no-brainer. What inspired me to
do Cake Balls is that these little spheres were staring to crop up,
but they were largely approached from a design perspective - boxed
cake, canned frosting and elaborate decoration. I wanted to put my
"flavor first" spin on them and I am thrilled with the result. I bet
you wont find a Crème Brulée Cake Ball elsewhere!
.
What does a typical day look like for you when you are
writing a cookbook?

GREAT question! My brain is most focused in the morning, so that is my
best writing time. I just keep writing until my brain dies, which is
usually early to mid-afternoon and then I head to the kitchen. I can
bake on auto-pilot, so I will often bake well into the evening. My
neighbors and gym pals are the happy recipients of my "practice"
batches.
.
With many food bloggers having aspirations of writing a
cookbook one day, what advice would you share that might be helpful to
help them get started?

Truth be told it was a different time in 1995 when I got my first book
contract. It is harder now; the market is much more crowded. You must
have a social media/online platform. Publishers will be looking for
ways that you can help publicize the book. You must start with
passion. What food subject are you passionate about? Dive into it,
become its most learned fan and start writing!
.

If you weren't authoring cookbooks, what might you be doing
with your life?

I would still be baking all the time, no question. It's what keeps my
creative juices flowing, it's a stress reliever - I just love it!
But...I also show my bull terriers and it would be great to just go on
the road with the dogs! Hopefully what is around the corner is the
launch of Bakepedia.com, my start-up, which will be the leading online
baking and dessert resource. This is in the works now - there is
nothing like it.
.
Thank you Dede for your time and interesting insights – is there
anything else that you would like to share with my readers?

I don’t mean to be preachy, but the fact of the matter is that the
great majority of email that I receive where there has been a problem
can really be sourced to the baker not following directions. Good
recipe developers write good recipes! We take pains to use specific
words and give accurate instructions. My best advice is to follow a
recipe to the letter the first time. Take notes. Maybe you want more
cinnamon? Perhaps it took 10 minutes longer to bake in your oven? Or
maybe next time you want to fold in milk chocolate chips instead of
semisweet. Make it your own! Use the recipe as a launching point...but
this only works if you make it as intended first, so that you actually
get to "know" the recipe. Happy baking!
.

Winner announcement:  Congratulations to Camille @Growing Up Gabel for winning the Cakeballs Cookbook and Erin @Dinners, Dishes and Desserts for winning A Bakers Field Guide to Doughnuts.  I will email each of you individually so I can get the details of where to send your lovely cookbooks!

CONGRATULATIONS Camille and Erin! Happy Baking!

Giveaway: (Is now closed - thank you to everyone who entered)
I am excited to announce that each of you have a chance to win one of Dede’s new cookbooks before they are even available in the stores. I have one copy of Cake Balls and one copy of A Bakers Field Guide to Doughnuts to giveaway that were generously supplied by The Harvard Common Press. This contest is open to US residents only, my apologies to my international friends!

How to Enter:
  • Leave a comment on this post and would love to hear about your favorite Cake Ball flavor.
  • Entries/Comments accepted until 9pm (PST), Friday, September 7th, 2012
  • Two winners will be randomly selected and notified by email.
  • This contest is open to US residents only, my apologies to my international friends!
 Bonus Entries:
  • Become a fan of Authentic Suburban Gourmet on Facebook. Leave an additional comment to let me know you became a fan.
  • Follow Authentic Suburban Gourmet on Twitter. Leave an additional comment to let me know you became a fan.
  • Follow Authentic Suburban Gourmet on Pinterest and Pin this giveaway with the cover photo from this post.  Leave an additional comment to let me know you followed and pinned the cover photo.

Red Velvet Cake Balls

Makes approximately 40 Cake Balls

Red Velvet Cake

Makes one 9x13 Base Cake

1 ¾ Cups all-purpose flour
2 Tablespoon + 1teaspoon sifted cocoa powder
1 teaspoon baking soda
½ teaspoon salt
1 Cup Buttermilk, room temperature
1 teaspoon apple cider vinegar
½ Cup butter, cut into pieces
1 ½ Cups sugar
1 teaspoon pure vanilla extract
1 Tablespoon red gel food coloring
2 large eggs, room temperature

Position a rack in the middle of the oven. Preheat the oven to 350 degrees. Coat the inside of a 9x13 rectangle pan with nonstick cooking spray; set aside.

Whisk together the flour, cocoa, baking soda, and salt in a medium bowl to aerate and combine; set aside.
In a separate bowl, whisk together the buttermilk and vinegar; set aside.

In a large bowl with an electric mixer on medium-high speed, beat the butter until creamy, about 2 minutes. Add the sugar gradually and beat until very light and fluffy, about 3 minutes, scraping down the bowl once or twice. Beat in the vanilla and red food coloring until thoroughly combined.

Beat in the eggs one at a time, scraping down after each addition and allowing each egg to be absorbed before continuing. Add the flour mixture in four additions, altering with the buttermilk mixture. Begin and end with the flour mixture and beat briefly until smooth. Pour the batter into the prepared pan.

Bake for about 25 minutes, or until a toothpick inserted in the center shows few moist crumbs when removed. The cake will have begun to come away from the sides of the pan. Let cool completely in the pan on a wire rack. The cake is ready to use. Alternatively, double wrap the pan in plastic wrap and store at room temperature for up to 1 day before proceeding.

Cream Cheese Frosting

4 ounces of cream cheese, room temperature
1 ½ Tablespoon butter, room temperature
½ Cup + 3 Tablespoons of Confectioner’s sugar

In a large bowl with an electric mixer on medium high speed, beat the cream cheese until smooth, about 2 minutes to eliminate any lumps. Add the butter and beat 2 more minutes until smooth. Scrape down the bowl a few times. Gently add the sugar on low speed until incorporated. Frosting should be creamy and smooth.

Assembling the Red Velvet Cake Balls

Use an electric mixer to combine the cake and frosting together. Crumble the cake and add the frosting to the bowl. Mix on medium, until all incorporated. The mix will be dense. Roll into golf ball sized cake balls. Refrigerate until firm.

Line two rimmed baking sheets with parchment paper. Melt 1 1/3 pound of semi sweet chocolate over a double boiler and low heat. Dip the balls one at a time in the chocolate, encouraging any excess chocolate to drip back into the bowl. Place, evenly spread on the prepared pans. Add a few mini chocolate chips and red sugar on top of each ball. Refrigerate briefly until the chocolate sets. Trim the bottoms, if needed. Place each cake ball in a paper cup, if desired. Place in a single layer in an airtight container and refrigerate for up to 3 days. Bring to room temperature before serving.

Sunday, August 26, 2012

Heirloom Tomato Tart


There is something about a really great savory tart. Perhaps it is the flaky crust or the luscious filling inside? Last weekend, I made a tomato tart to celebrate the heirloom tomato season. I am particularly drawn to the baby heirloom tomatoes which I pick up at my local Trader Joe’s.


The vibrant colors and tiny size make then irresistible. When I first saw this recipe, it called for regular sized heirloom tomatoes and thought the miniature version would be simply ideal. I switched out the goat cheese for blue cheese and omitted the onions. In addition, I had my own pesto recipe that I have been using for years and utilized it.


The quintessential portion of a distinguished tart is the crust. You are looking for the flaky, golden brown color and buoyancy to come from the precise crumble of the chilled butter. With the first bite of tart, the crust should simply melt in your mouth with the filling being secondary to the tart experience.


With the baking of the tomatoes, the sweetness emerges and the flavor profile just pops in your mouth. The salty, richness of the blue cheese along with the fresh thyme adds a burst of savory flavor. This tart was simply amazing.

We have really great friends coming to town on Wednesday to have dinner at our house and stay the night. I am the process of finalizing my menu for this special evening. This tomato tart will be the starter to our dinner. I think my friends will be in tomato heaven - can't wait until they arrive!


Heirloom Tomato Tart
Adapted from White on Rice Couple

Tart Dough
(Recipe from David Lebovitz)

1 1/2 cups flour
4 1/2 ounces butter, chilled, cut into cubes
1/2 teaspoon salt
1 large egg
2-3 tablespoons cold water

Make the dough by mixing the flour and salt in a bowl. Add the butter and use your hands, or a pastry blender, to break in the butter until the mixture has a crumbly, cornmeal-like texture.

Mix the egg with 2 tablespoons of the water. Make a well in the center of the dry ingredients and add the beaten egg mixture, stirring the mixture until the dough holds together. If it’s not coming together easily, add the additional tablespoon of ice water.

Gather the dough into a ball and roll the dough on a lightly floured surface, adding additional flour only as necessary to keep the dough from sticking to the counter.

Once the dough is large enough so that it will cover the bottom of the pan and goes up the sides, roll the dough around the rolling pin then unroll it over the tart pan. “Dock” the bottom of the pastry firmly with your fingertips a few times, pressing in to make indentations.

Basil Pesto Sauce

2 C. Fresh basil leaves, packed tightly
½ C. Parmesan cheese, freshly grated
1/3 C. Pine nuts, toasted
½ C. Olive oil
3 Garlic cloves, smashed
Salt and pepper to taste

Use a food processor to make this sauce. Simply add the basil leaves, parmesan cheese, pine nuts and garlic cloves. Pulse for 10 seconds and then slowly pour the olive oil into the mixture while food processor is on. Continue to pulse until the mixture is smooth. Taste and then season with salt and pepper. Place into an airtight container immediately so the bright green color remains. Refrigerate until ready to use.

Tomato Tart Ingredients

1 to 1 ½ C. Baby Heirloom Tomatoes (cut in half)
¼ to ½ C. Pesto (see recipe)
1 T fresh Thyme Leaves
½ C. Blue Cheese (crumbled)
Sea Salt & fresh cracked Black Pepper

Preheat Oven to 400º F.

Make tart dough and roll out into a 9" or 10" tart pan. I used a rectangle tart pan. Trim excess dough.
Press the bottom of the tart with your fingers to "dock" it, making indentions in the bottom.  Spread the ¼ to ½ cup of pesto over the bottom of the crust.

Layer tomatoes cut side up, then sprinkle the crumbled blue cheese and add the thyme leaves. Season with salt and pepper to taste.

Bake for 30-45 minutes or until cheese and edges of tomatoes are starting to char, and crust is golden brown.


Thursday, August 23, 2012

Medjool Dates with Chevre and Reduced Balsamic


I love the simple things in life. Whether it is just reading a exalted book, playing with my doggie or listening to a remarkable song. When it comes to cooking, combining a finite number of great ingredients often produces great results. If you mix up the sweet, savory, salty and sour – the combination is often quite memorable.


A couple weeks ago my account executive and I took one of our wonderful clients to lunch. While we were catching up, the conversation turned to food. I know you are all saying – what a surprise? Our client very much enjoys dining out around town and experimenting at home with a variety of dishes. I shared that my hubby and I have a tradition of having wine and appetizers every Friday night. Sometimes just with the two of us and other times with friends.

Our client proceeded to share a very simple recipe that he and his wife make quite often. After hearing the simple list of ingredients and the flavor profiles, I knew that I had to make this. Here is the recipe, although it is rather a free form appetizer and I hope that you enjoy with a great glass of wine.


Medjool Dates with Chevre and Reduced Balsamic

Makes 12

12 Medjool Dates
4 T. Chevre (goat cheese)
½ C. Balsamic Vinegar
Fleur de Sel

With a knife, cut a slit in each date to remove the pit. Slightly push the ends inward to form an opening for the goat cheese. Add approximately 1 teaspoon of chevre to each date. You can always add more if you desire.

In a small sauté pan, add the balsamic vinegar and put it on medium heat. You will need to watch the vinegar to prevent burning. Cook for about 5 to 10 minutes until the vinegar resembles syrup. Let cool for a few minutes before drizzling over each date. Sprinkle the fleur de sel over each date.

Monday, August 20, 2012

Fudgy Butterscotch Brownies | Secret Recipe Club


Perhaps you have been on a long extended vacation and missed hearing about the Secret Recipe Club.  It is a group of talented food bloggers who once a month are assigned a fellow food blogger to peruse their blog to find a recipe that intrigues them .  In turn they recreate it and add their own spin or simply leave as it and post it.  The big reveal happens once a month and that is where the fun begins.  For more information, please check out the Secret Recipe Club.


This month I was assigned to the fun blog - Yumsilicious Bakes.  Right when you see the front page, you know you are in for a blog full of delicious baked treats.  Avanika is originally from Bombay India and is currently residing in the United Kingdom to complete her Masters in Marketing and Strategy.  Avanika selected the name of her site to reflect her definition of giving the highest possible rating to food and is the epitome of the best.  Her ultimate goal is to work in the corporate world for a while, then open a bakery back in her hometown of Bombay.  Best of luck with your aspirations!!


Recently my Dad took a fall and was in tremendous pain.  The result was a fractured hip which called for an immediate hip replacement.  Needless to say, this weekend was filled with many visits to the hospital for our family along with many prayers for a safe surgery and speedy recovery.  Times like this really make you think about what is important and family is number one.  The good news is that the surgery was at 8am yesterday and all went really well.  Now it is recovery time and spending time with the ones I love.


Time slipped away this weekend and my SRC post certainly did not make it up on time.  However, Debbie was kind enough to reach out to me and I explained the situation and she could not have been more understanding.  I had these Fudgy Brownies picked out already.  I rushed home after my work day to whip them up to share with all of you.  I always like to add my own spin to a recipe, so I thought to cut the chocolate chips in half and replace the other half with butterscotch chips.  The result was amazing – thus I named these – “Fudgy
Butterscotch Brownies”.  Enjoy!

Fudgy Butterscotch Brownies

10 oz semisweet chocolate
3 oz. unsweetened chocolate
3/4 cup butter
1 cup  granulated sugar
3 large eggs
1 tbsp vanilla extract
1/2 cup + 1 tbsp flour
1 1/2 tsp baking powder
1/2 tsp baking soda
1/2 tsp kosher salt
3/4 cups semisweet chocolate chips

¾ cups butterscotch chips
Preheat oven to 350 F. Grease and flour the 9x13 pan.

Melt the semisweet chocolate, unsweetened chocolate and butter in a double boiler, or microwave. Allow to cool to room temperature.In the meanwhile, combine together the eggs, sugar and vanilla. Do not overbeat! Once chocolate is cooled, add in the egg mixture. Stir to combine. I always use a wooden spoon/spatula to make brownies, rather than a mixer.
Sift together the flour, baking powder, and baking soda, and add to the chocolate mixture. Stir just well enough to combine, making sure you get right to the bottom of the pan. Stir in nuts, chocolate chips and butterscotch chips. Bake for 35 minutes, or until a toothpick inserted has crumbs sticking to it, rather than wet batter. The center will remain soft. Do not over bake! Cool completely in pan.Let cool completely until cutting into squares. Please try these brownies!


Tuesday, August 14, 2012

Marinated Mozzarella Balls


Where has the time gone? It has been one heck of a week. I can’t believe my last post was a week ago. Over the weekend I prepared a quick and simple appetizer that I am so excited to share with all of you.

Last week I was driving to one of my offices in the morning, listening to talk radio and getting caught up on the latest headlines when my mind began to drift. With peak commute traffic in full swing, my eyes were on the road along with practicing defensive driving. During commute hour in the Bay Area, the majority of the drivers are what my hubby and I call – “the professionals”. These are the folks who commute daily and are on a mission to get from point A to point B without delay. Typically the professionals drive safely but with a distinct purpose.


So with my mind drifting during my morning commute, it went to food. Where else would a foodies mind go? Smile. With our traditional Friday night wine and appetizer night approaching, I wanted to make something new and fun yet easy and flavorful. I wanted to lighten up our assortment of appetizers. The idea of marinating little mozzarella balls just popped in my head.


Next on the list was to create a combination of flavors along with adding some interest. Recently I had purchased pink peppercorns which are light as air yet have a delicate fruitiness quality. These spicy, dried berries have a deeper and more balanced pepperiness than the traditional black pepper. No need to use a spice grinder, simply crush with your fingers or use a mortar and pestle.

The pink peppercorns were the inspiration and added that pop of color. I am a bit obsessed with unique salts, so I thought I would continue with the color theme and add Hawaiian Red Salt. To brighten the flavors a bit of Thai basil and lemon zest completed the dish along with some wonderful extra virgin olive oil.

During our Friday night appetizer night, we had some friends over and this appetizer was among the first to be devoured. Enjoy!


Marinated Mozzarella Balls

Mozzarella Balls, rinsed and dried
Olive oil
Zest of one medium lemon
Basil, chiffonade (I used Thai basil)
Hawaiian Red Salt
Pink Peppercorns

This is a very loose recipe. If you are serving multiple guests, calculate the number of mozzarella balls to be an average of 6 to 8 per person.

Rinse and dry the mozzarella balls. Place into a large bowl. Drizzle a generous amount of olive oil over the mozzarella balls. Sprinkle the lemon zest and basil over the mozzarella balls. Next add the Hawaiian red salt and crush using your fingertips the desired amount of pink peppercorns. Stir all together and let sit for at least 15 minutes in the refrigerator. Prior to serving, stir mixture and plate onto your favorite bowl or platter.

Monday, August 6, 2012

Funfetti Cake Batter Cookies


Yesterday was one of those days where I had a craving. Wasn’t quite sure at first – did I want salty or sweet? After a moment of contemplation, it was clear – something sweet was on the craving horizon. My next question to myself was, what sweet delight would I indulge in? Chocolate is great but not my “go to” ingredient to satisfy a sweet craving. I much prefer a caramel or sugar cookie. Simultaneously along the sweet craving was an urge to bake. Do you ever get a simple urge to bake something?

With the death of our refrigerator a couple weeks ago, we are still in the process of finalizing our selection. We spent a good portion of the day at the appliance store, which can be fun yet exhausting. We are close and should finalize this week. You don’t realize how much you appreciate the convenience of having a working refrigerator until it stops one day. Thank goodness, we have our trusty 20 year old refrigerator in the garage. Needless to say, it was a long day and coming back home to unwind and get ready for the work week ahead was foremost on my mind. Not to mention the baking bug bit me along with the sweet craving.


I knew the baking task needed to be simple yet something that would satisfy my craving. I must admit I enjoy eating the batter more than the finished product, so that part weighed into my decision of what type of baked delight I would make. Cookies seemed like the logical choice and something I could share with my hubby along with my co-workers on Monday morning.

I proceeded to gain some inspiration from my various Pinterest boards and quickly decided upon the Funfetti Cake Batter Cookies from here. I have always been drawn to a white cake with white frosting with colored sprinkles on top. With my favorite cake wrapped up into a cookie; that was my final decision and perfection in my book.

You just have to love a simple cookie that uses a cake mix with a couple ingredients added to the mix. They were not only simple yet incredibly tasty. Most importantly they completely satisfied my sweet craving. Not to mention, hubby was quite happy with the scent of fresh baked cookies in the air along with a few in his tummy.


Funfetti Cake Batter Cookies

Makes 30-32 cookies

1 box vanilla cake mix, 18.25 oz
1 tsp baking powder
2 eggs
1/2 C vegetable oil
1 tsp vanilla extract
1 C color sprinkles

Preheat oven to 350°. In a large bowl, mix together the cake mix and baking powder. In a small bowl, mix together the eggs, oil and vanilla. Add the egg mixture to the cake mixture and stir to combine. Stir in the sprinkles by hand, not using the mixer. Use a small ice cream scooper that drops the cookie onto a cookie sheet or silpat. Sprinkle a few extra colored sprinkles on top of each cookie before baking. Bake for 9 to 10 minutes until light brown along the edges. Allow to cool for 5 minutes on cookie sheet before transferring to cooling rack. They will be very soft at first.

Thursday, August 2, 2012

Napa Valley Jewel: Cindy's Backstreet Kitchen


Nestled behind the main street in downtown St. Helena is a Napa Valley jewel called Cindy’s Backstreet Kitchen. The outside of the restaurant is understated yet it is adorned with vibrant foliage and colorful flowers in the window boxes. Once you enter, you feel as though you are entering someone’s home and my assumption would be that is the purpose behind the décor, ambiance and restaurant name.


Cindy Pawlcyn the owner has planted many restaurant roots in Napa Valley along with the legendary Mustards Grill that flanks highway 29 along the entrance to the world famous wineries. Many well-know Bay Area dining establishments have been touched by Cindy’s magic including Fog City Diner, Bix, Roti, Betelnut and Tra Vinge. Her culinary chops began at the early age of thirteen by working at a local cooking school and assisting her mother in the kitchen. With an entrepreneurial spirit, she ran a catering business during her high school years.


She cooked in several states prior to landing in Napa Valley and earned the prestigious honor of being named as the opening chef at Meadowood. This eventually led her to launch in 1983, Mustards Grill which today still boasts crowds and waiting lists to eat the divine cuisine. She maintains a commitment to seasonal inspirations through the bounty of the garden along with the variety of ingredients provided in the area. She has been recognized on numerous occasions and has been highly decorated with the culinary best awards such as: “Who’s Who of Cooking in America" nominated twice for the James Beard Foundation award for Best Chef in California and is the recipient of the Robert Mondavi Award for Culinary Excellence.


Cindy’s Backstreet Kitchen has been on my restaurant bucket list for sometime. With it being my turn to choose the restaurant for our “Restaurant Club” excursion, it was an easy decision. Now I was able to place a check mark next to Cindy’s Backstreet Kitchen. We typically set our reservations for 11:30am to get ahead of the crowds and allow a leisurely dining experience. The day we went was fairly warm outside, so we elected to dine inside.


We had a fantastic waiter and please forgive me for not remembering his name. He was full of personality, knowledgeable and gave impeccable service. At one point, he noticed I was taking photos of each dish, so he brought over a copy of the lunch and dessert menu for me to take home. (Now that is service in my book.) We enjoy ordering a variety of items so we can taste numerous dishes and enhance the full menu experience.


We started with the Polenta Fries. Let me just say that we died and went to heaven with these deep fried nuggets of polenta joy. They were perfectly creamy with a crispy outside and a touch of salt – pure decadence. I enjoyed a glass of Ehlers 2009 Cabernet Sauvignon which was full bodied with ripe fruit, a hint of spice, toffee undertones and a smooth finish that was delightful.


For our first course, we enjoyed Cindy’s Curried Chicken Salad with mixed greens, Arugula, radishes, almonds and crispy bacon. This is a signature salad and after tasting it, the creamy curry dressing along with all of the ingredients, it was a perfect pairing of flavors. The Butter Lettuce salad with cucumbers, cherry tomatoes, celery leaves and buttermilk-dill dressing was well chilled and left me wanting to eat this every night. It was perfectly chilled, crisp and embodied a delicate balance of flavors.


I enjoyed the Pasta Del Giorno which was handmade pasta with Arugula pesto, Chinese broccoli and bright cherry tomatoes. Brenley opted for the Mighty meatloaf with horseradish barbeque sauce and garlic mashed potatoes. Lynette selected the fresh fish of the day which was sturgeon and adorned with a Charmoula sauce, beans and potatoes. I had never actually tasted Sturgeon and/or Charmoula sauce, but both were simply outstanding and the dish hit a homerun. Note to self – make charmoula sauce soon.


A restaurant club lunch would not be complete without tasting a few desserts. Despite having relatively full bellies, we ordered dessert. Can you tell our arms were being twisted? Smile. We selected the CP Railroad Avenue Parfait with house made ice cream, sorbet, sauces and a cookie. Our second selection was the Warm Plum & Blueberry Brown Butter Cake with house made vanilla ice cream and warm berry sauce. Both desserts were amazing.


Overall, we collectively ranked our dining experience high on our list. The food was brilliant. The setting was relaxing, inviting and comfortable. The service was perfect. Last but not least the company was sublime. I would highly recommend adding Cindy’s Backstreet Kitchen to your restaurant bucket list and making a reservation. You will not be disappointed.